
A lot of digital marketers have a social media speciality. Mine’s Instagram.
I LOVE INSTAGRAM.
Whether my timeline is filled with my friends looking BOMB in selfies; perfectly curated aesthetic travel bloggers or pictures of my favourite musicians/actors chilling in their widely expensive homes, I just love it!
It does have its downsides though, filters, photoshop and more can contribute to body dysmorphia and there are plenty of trolls out there just waiting to take a good person down.
But here, with me, Instagram is a well of opportunity just waiting to be tapped.
Copyright credit to Instagram.
In this blog post, I will be guiding you through how to make an instagram account that best suits what you’re after. Instagram offers many amazing features to customise your account to get the most out of it, with variations such as a business account and a creator account.
Signing Up
First things first, you need to actually sign up to the app!
I recommend signing up with your musician/business email as opposed to your personal one. That way if you receive any emails, they will be sent to the account where you manage your gigs/business.
If you don’t have an email like this, just make one! Its so quick and simple to make new email addresses, it will take you 5 minutes max.
Make sure your password is secure. Some good ideas for making a safe password are:
- Using both lower and UPPER case
- Adding at least 1 number
- Use a special character such as !_-^ etc
If you can’t think of anything, a tip I learnt about is looking at 3 things around you and combining them. For example (and no, this is NOT any of my passwords before you ask) if I combine 3 items near to me, using lower and uppercase letters and using a special character, my super secure password would be Chair_Phone_Desk132. Who on earth would guess that! (Just make sure its something you can remember!)
Username Time
This is hard.
I can spend ages agonising over what my username will be when I join a new website.
But since we’re creating an account for your music/ music-related business, it narrows the name choices down massively.
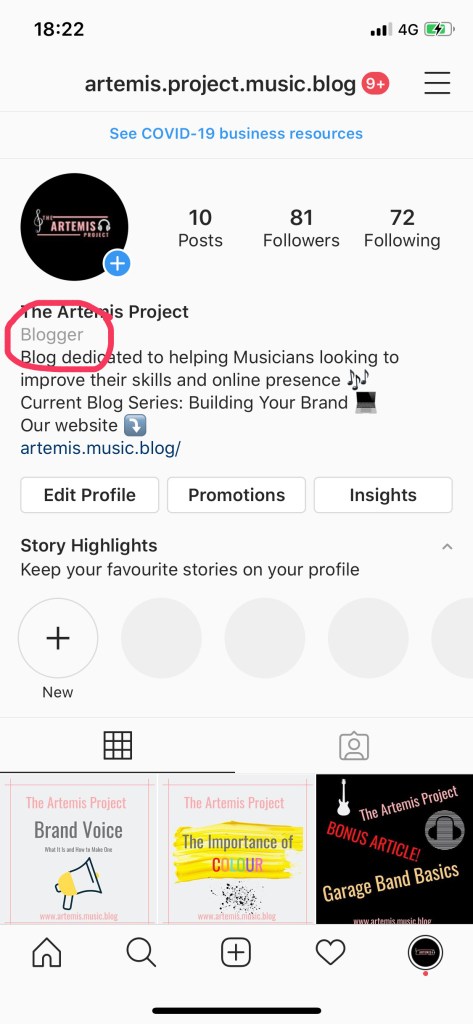
For example, this blog has an instagram!! It’s @artemis.project.music.blog (give it a follow https://www.instagram.com/the.artemis.project/).
The @ is clearly the name of the blog and tells you what it is. It used to be @the.artemis.project but it was changed to its current @ as there is a board game of the same name, along with a few other variations for other peoples accounts. (But this is the best one 😉 definitely)
Let’s say your name is John Smith, its very likely that someone will already have taken the username @johnsmith or even @johnsmithmusic. If you’re finding it hard to think of a username that is similar to what you want, or is taken, try out these variations:
- @john_smith_music
- @john.smith.music
- @johnsmith_music
- @johnsmithmusician1
- @j.smith_music
- @johnsmith87
You don’t want a username that is too long, otherwise it won’t be memorable!
Changing your account type
Now that you’ve created your unique username and password, it is time to change your account from a personal account to a creator account.
Why should you do this? Because a creator account means you can host ads, look at follower statistics, see when your followers are most active and see your insights for each individual post.
A business account also exists but I personally prefer to use a creator account. If you have a business, check to see if a business account is more suited towards your needs.
To do this, click on the three lines in the right hand corner of your screen. This will bring up a menu. Then click on settings. Find Account (for me, its the third from the bottom) and scroll down. At the bottom of the menu, you should see Switch to Professional Account in blue.
This screen should pop up:
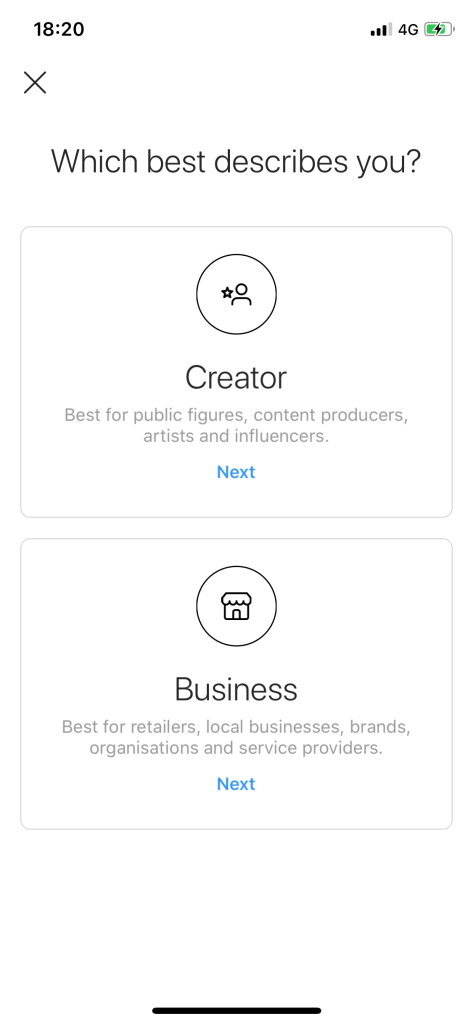
Click on creator and then you’ll find yourself with an option to select your category. This doesn’t change anything about how the app works for you, but it does help to show other people what you are when they click on your profile. Search for one that feels right for you. For @artemis.project.music.blog, I chose Blogger.
You can choose whether or not you want this to appear on your profile, but why not! If you are a musician, why not have everyone know it when they arrive on your profile.
Now you’re ready to start posting- but WAIT!
Before you start posting, its important to remember your brand voice and target audience that we spoke about in the last blog post.
If you haven’t had a chance to read the Brand Voice blog post- go and check it out before continuing.
Where can you put these things we’ve learnt into action? In the caption!
Captions
Deciding what to write to go under your photos is a tricky business. There are only a few lines that appear before you have to click to ‘see more.’ If you’re writing a shorter caption, it has to contain all the info you want to share in a few short lines button the other hand a longer caption has to be able to draw your follower in to make them want to click to see more.
Doing some competitive research on similar accounts to see how they structure their captions is worthwhile. Also, if you have the opportunity to link to a blog post or video containing more information, you can keep the caption short whilst directing readers to the link in your bio.
Aesthetic
When you click on someones feed, if it isn’t visually appealing, its much less likely that you’ll want to follow them unless it’s someone you already know.
Don’t get me wrong, its super hard to create a consistent and attractive looking feed. As well as working on this website and the instagram that goes with it, I have been running a travel blog for a year and a half and still hugely struggle!
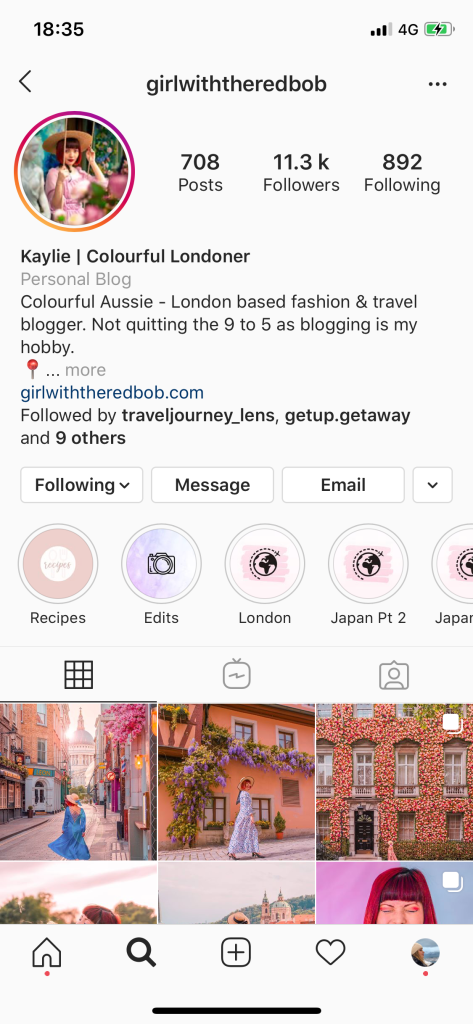
Although she isn’ a musician, check out @girlwiththeredbob. Now I’m not saying your feed has to look anything like this or even be consistent in colour, but when it comes to aesthetic feeds, this girl is a queen.
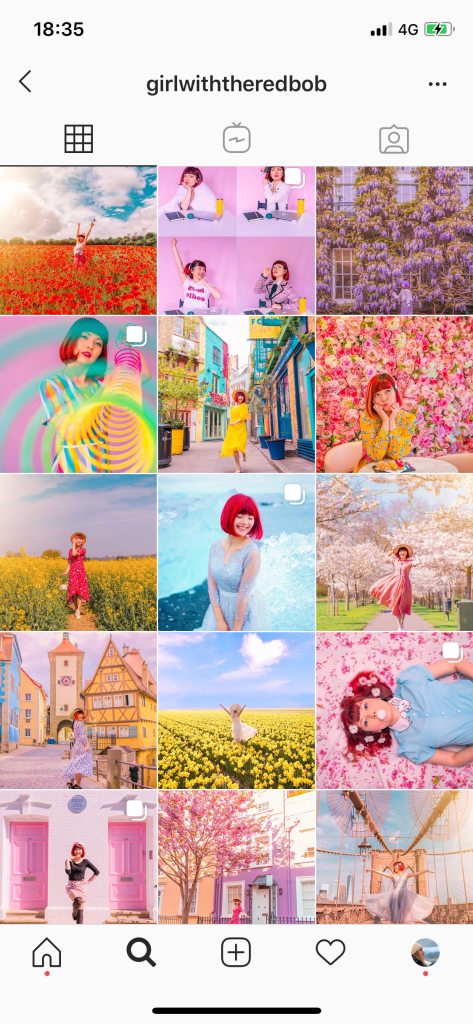
A quick tip to remaining consistent even when your photos look nothing alike is to have consistent brightness. If you have a mix of light and dark based photos, post all the light ones together and let them lead into the dark ones- it is far more pleasing to the eye than a jumble!
Got all these down? Now it’s time to get posting!!
Keep your eyes out for the next post where we will talk about Hashtagging, using your analytics and more.
Thanks!
